
Software projects are an iterative process. Tests, linting, and even deployment should occur at every step of that iteration. One can make such tasks much easier with task runners like Grunt or Gulp, but the burden of remembering to do it still lies on the individual. That's where Continuous Integration comes in handy.
Continuous Integration services like Travis CI, Circle, and Jenkins provide a way for projects to automatically run certain tasks on each commit or pull request to a project. Typically, CI is used to run a suite of tests defined by the project and then deploy if all the tests pass.
My experience lies in Travis CI, though Circle should be equally easy to set up. There are some nuances to setting up Travis, though, which I'll cover in this post.
Table of Contents generated with DocToc
- Setting up Travis CI
- 1. Connect Travis CI to GitHub
- 2. Set up Travis CI settings
- 3. Talking with Travis
- 4. Setting up your tests
- 5. Making the initial install work
- 6. Making Chrome work inside Travis
- 7. Getting Mocha tests from Gulp to work in Travis
- 8. Disable those pesky email notifications
- 9. Deploying to Heroku
- 10. Send test coverage info to Coveralls
- The complete picture
Setting up Travis CI
It's free for public repos on GitHub, costs you a lot for private repos. I'm assuming you're working with a public GitHub repo.
1. Connect Travis CI to GitHub
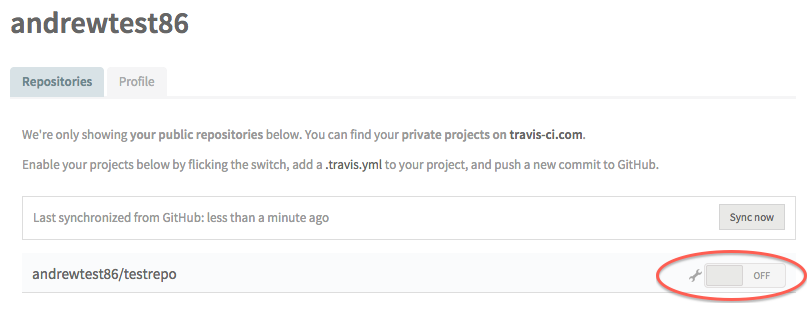
- Go to Travis CI and set up your account using GitHub (top-right corner).
- Click the "on" switch next to repos that you want Travis to track.
- Profit.
It's just that easy.
Not that easy? Let's troubleshoot.
You may need to sync your GitHub repos if it's not showing up.
If you're part of an organization and the organization's repo is not showing up, you probably aren't publicizing your membership.
Go to GitHub settings for the organization...

Click on the People tab...

Change your "organization visibility" setting.

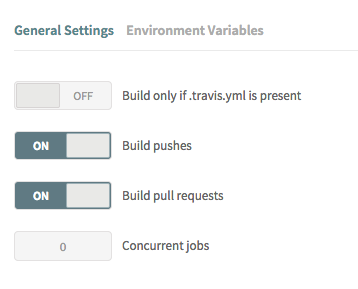
2. Set up Travis CI settings
The default settings should work for most use cases.
If you have environment variables in your application, set them on the tab "Environment Variables" under settings.
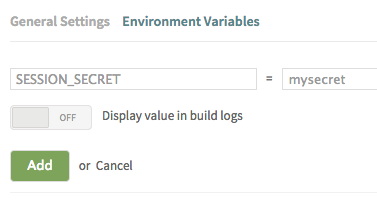
There are other ways to set environment variables, this just happens to be the simplest way.
3. Talking with Travis
Here's a basic rundown of what Travis does:
- Watches GitHub repo for changes, e.g. a pull request, a commit
- Grabs that version of the repo, pulls it into a worker
- Runs
npm installandnpm test - Sends results back to GitHub
You communicate special instructions to Travis CI by a .travis.yml file, which lives in the root directory of your project. Here's a basic version for a Node project:
language: node_js
node_js:
- '0.10'
Assuming for the moment that tests are already set up, Travis CI will communicate the status of its build on a particular commit inside of GitHub:


Travis status communicates to the rest of the team about how well your code "integrates" with the existing code base. Does it pass a linting check? Does it break other project features? Travis automates all of that and takes the burden of checking off the individual.
4. Setting up your tests
Like most tasks in programming, there are many ways to accomplish this task. The basic idea is have your npm test command do something meaningful. You set this command inside package.json:
{
  "scripts": {
    "test": "gulp test"
  }
}
It could be something else, like a command-line call to mocha or karma, but given my love for automation, I've placed all these tasks inside my gulp test task.
5. Making the initial install work
Depending on your dependencies, you may run into obscure errors during npm install on Travis. This may occur because Travis CI uses version 1.4 of npm. You can tell Travis to manually upgrade npm before running the install inside your .travis.yml file:
before_install:
- npm install -g npm
6. Making Chrome work inside Travis
If you're running client-side tests, e.g. with Karma, a browser is required. Initially, I set Karma to use Chrome. Turns out that Travis doesn't have a Chrome binary file, so it can't exactly launch the browser inside the Travis environment. Your options are to switch to Firefox, which is provided by Travis, or Phantom, which is headless. If you want to stick with Chrome like me, here's how you adjust your Karma config file:
module.exports = function(config) {
  config.set({
    ...
    //  Custom launcher for Travis-CI
    customLaunchers: {
      chromeTravisCI: {
        base: 'Chrome',
        flags: ['--no-sandbox']
      }
    },
  });

  // Custom configuration for Travis-CI
  if(process.env.TRAVIS) {
    config.browsers = ['chromeTravisCI'];
  }
}
Then, add this additional configuration in .travis.yml:
before_script:
# Special config for Chrome on Travis-CI
- export CHROME_BIN=chromium-browser
- export DISPLAY=:99.0
- sh -e /etc/init.d/xvfb start
7. Getting Mocha tests from Gulp to work in Travis
This is a specific troubleshooting case, focusing on mocha tests run through gulp in the Travis environment.
There's something funky about mocha tests where sometimes it doesn't exit properly from the task. You run gulp mocha, it runs all the tasks, but it doesn't exit; it hangs there, doing nothing, and you have to hit ^ + C to escape. That's fine on your local machine, but it won't work for Travis: there's no place to hit ^ + C there. Here we'll learn how to do it (sort of) from within gulp.
With Node, you can force a task to exit with process.exit(). You can also pass a result from the process: process.exit(1). If you pass something along, e.g. 1, it means an error occurred. Otherwise, all is well.
Taking this functionality, you can give a swift kick to gulp mocha once it's finished. More comments are inline to help parse the information.
var mocha = require('gulp-mocha');
var plumber = require('gulp-plumber');

/**
 * handleMochaError
 * ================
 * Simple error handling specifically for mocha. Reports the latest error
 * encountered, then uses `process.exit(1)` to force an exit from the gulp
 * task and communicate that an error occurred (e.g. to Travis CI).
 */
var handleMochaError = function (err) {
  console.log('Mocha encountered an error, exiting with status 1');
  console.log('Error:', err.message);
  process.exit(1);
};

/**
 * mocha
 * =====
 * Runs mocha tests.
 */
gulp.task('mocha', function (cb) {
  return gulp.src(paths.serverSpec, {read: false})
    .pipe(plumber())
    .pipe(mocha())
    /**
     * Keep track of latest error on Mocha. Because a failed test counts
     * as an error, the process should not be exited until end of tests.
     */
    .on('error', function(err) {
      /**
       * This intermediate log is useful for when mocha crashes (as opposed
       * to a test failing), especially necessary for Travis CI reporting.
       * Without these logs, Travis CI will not report anything meaningful
       * if mocha crashes. Can be commented out if desired.
       */
      console.error('ERROR:', err.message);
      console.error('Stack:', err.stack);
      mochaErr = err;
    })
    /**
     * The methods below are a hack to get gulp to exit after mocha tests
     * finish. Without them, `gulp mocha` doesn't exit and Travis
     * never finishes running the tests.
     */
    .on('end', function () {
      if (mochaErr) return handleMochaError(mochaErr);
      // Force mocha to exit, because gulp-mocha is stupid.
      process.exit();
    });
});
8. Disable those pesky email notifications
They'll spam your inbox into oblivion. Get rid of them this way in your .travis.yml file:
# Disable email notifications
notifications:
  email: false
9. Deploying to Heroku
I'm assuming you already have Heroku set up on your repo. If you don't, do that first.
Here you'll need the Travis CLI tool. It's a Ruby gem, so make sure you can work with those. Instructions to install the tool are here.
Once done, type into your terminal:
$ travis setup heroku
It will magically add some details to your .travis.yml file that will allow Travis to communicate with Heroku. All the information is encrypted, so you don't need to worry about ne'er-do-wells gaining access to your Heroku app.
# Deploy to Heroku on successful build on `develop` branch
deploy:
  provider: heroku
  api_key:
    secure: c6G807KC0GI/26YRBFbsi0XuYBUVH7VJ44xv03z400EJKM4SvSqMUZMBjHjCJTuPX7GxEDUV6tcj3paS1fpe2hckiHXyePQJSIOaYrW4TloZR8u4hVSy6jF6snjHZ+RLvB6k25Pe13KEpUDJKSRpioAnFtmQttVefuHZoIjVN0s=
Travis only deploys to Heroku on a successful build (i.e. it runs git push heroku from its current build). You can tell Travis to only deploy from a specific branch, e.g. master:
deploy:
  ...
  on: master
You can, as usual, customize further.
10. Send test coverage info to Coveralls
Check out my tutorial on setting up Coveralls for details.
The complete picture
I spent much of my first group project at HackReactor, known as the Greenfield project, on project deployment, automation, and testing. You can learn a lot by hunting around the setup here.
As usual, this post only scratches the surface of what Travis can do. If you think of something you want, it's likely possible.
Get stuck on your setup? Let me know and I'll try to help!